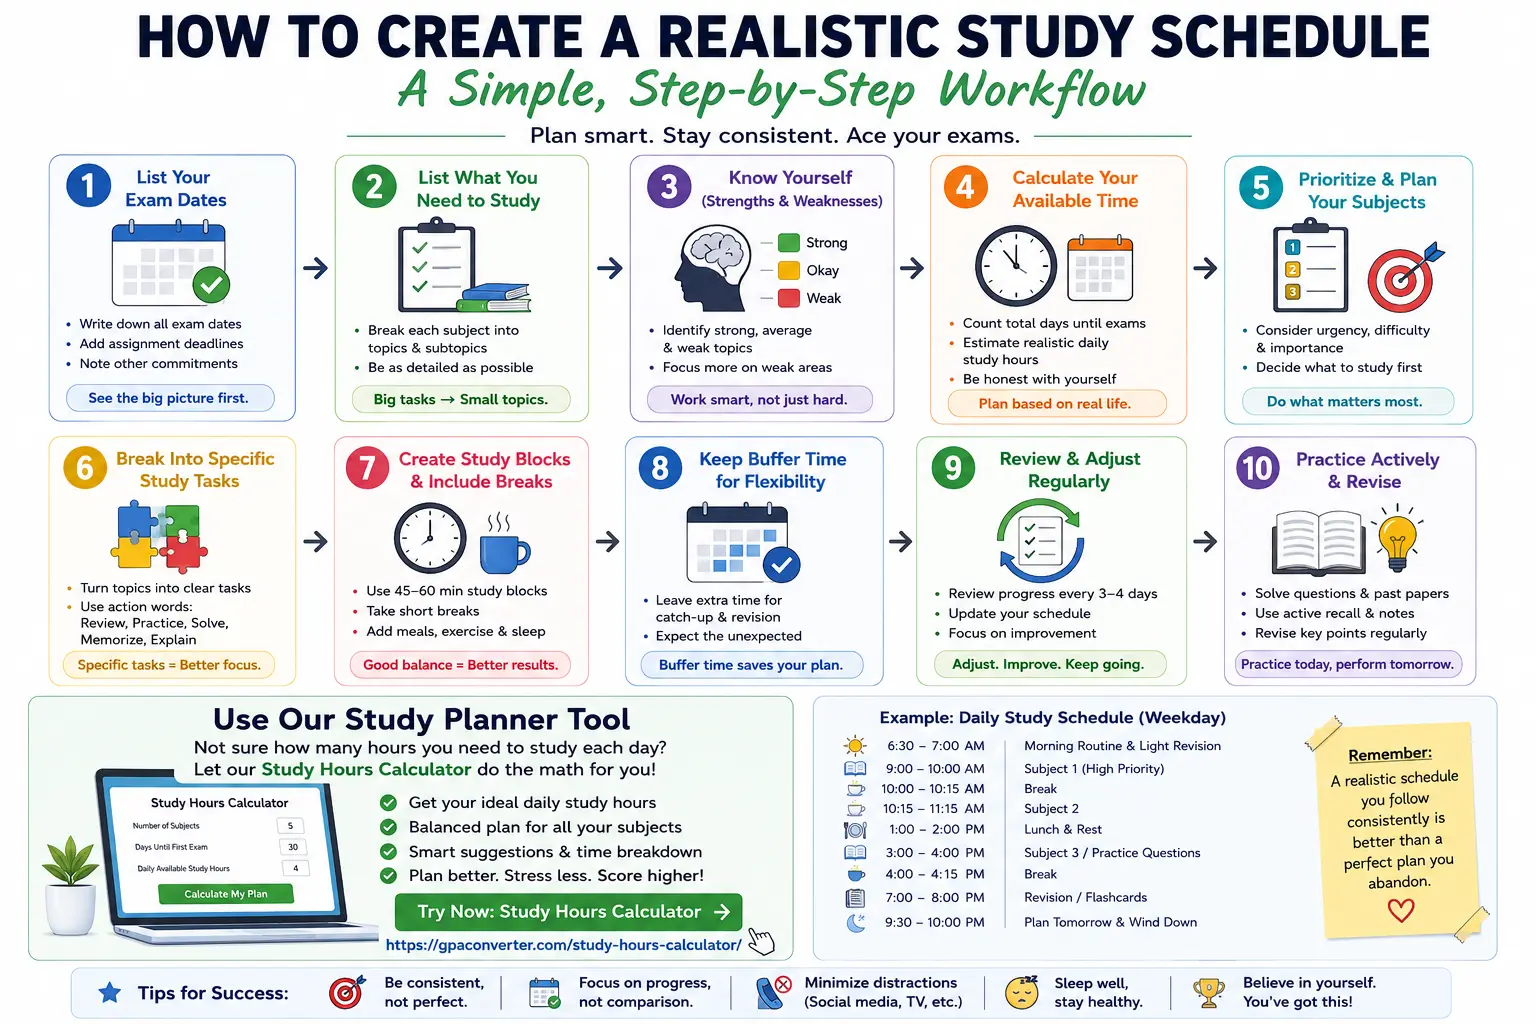
Exams can make even simple decisions feel overwhelming. You know you need to study, but figuring out what to study, when to study, and how to fit everything into the time you have left is often the hardest part.
That is where a realistic study schedule can help.
A good study plan is not about spending every hour of your day with books, notes, and practice questions. It is about creating a plan that actually works and is easy to follow. It should help you prioritize important subjects based on your confidence level and overall difficulty, manage your available time, track your progress, and leave enough room for rest and unexpected problems.
In this guide, you’ll learn how to create a realistic study schedule before exams, step by step.
Why You Need a Realistic Study Schedule Before Exams
Many students create study timetables that look impressive but are almost impossible to follow.
For example, you might plan to study for 10 hours every day, wake up at 5 A.M., revise 5 subjects, complete practice papers, and still have time for everything else in your life.
The problem is simple: an unrealistic schedule usually creates guilt instead of progress.
When you fall behind on the first day, it becomes tempting to abandon the entire plan.
A realistic study plan works differently. It considers:
- How many days you have before each exam
- Which subjects and topics you need to study
- Which topics are most difficult
- How much time you genuinely have each day
- Your existing responsibilities
- Your concentration and energy levels
- The need for breaks, sleep, and revision
The goal isn’t to create the perfect timetable; it’s to create a study plan you can consistently follow.
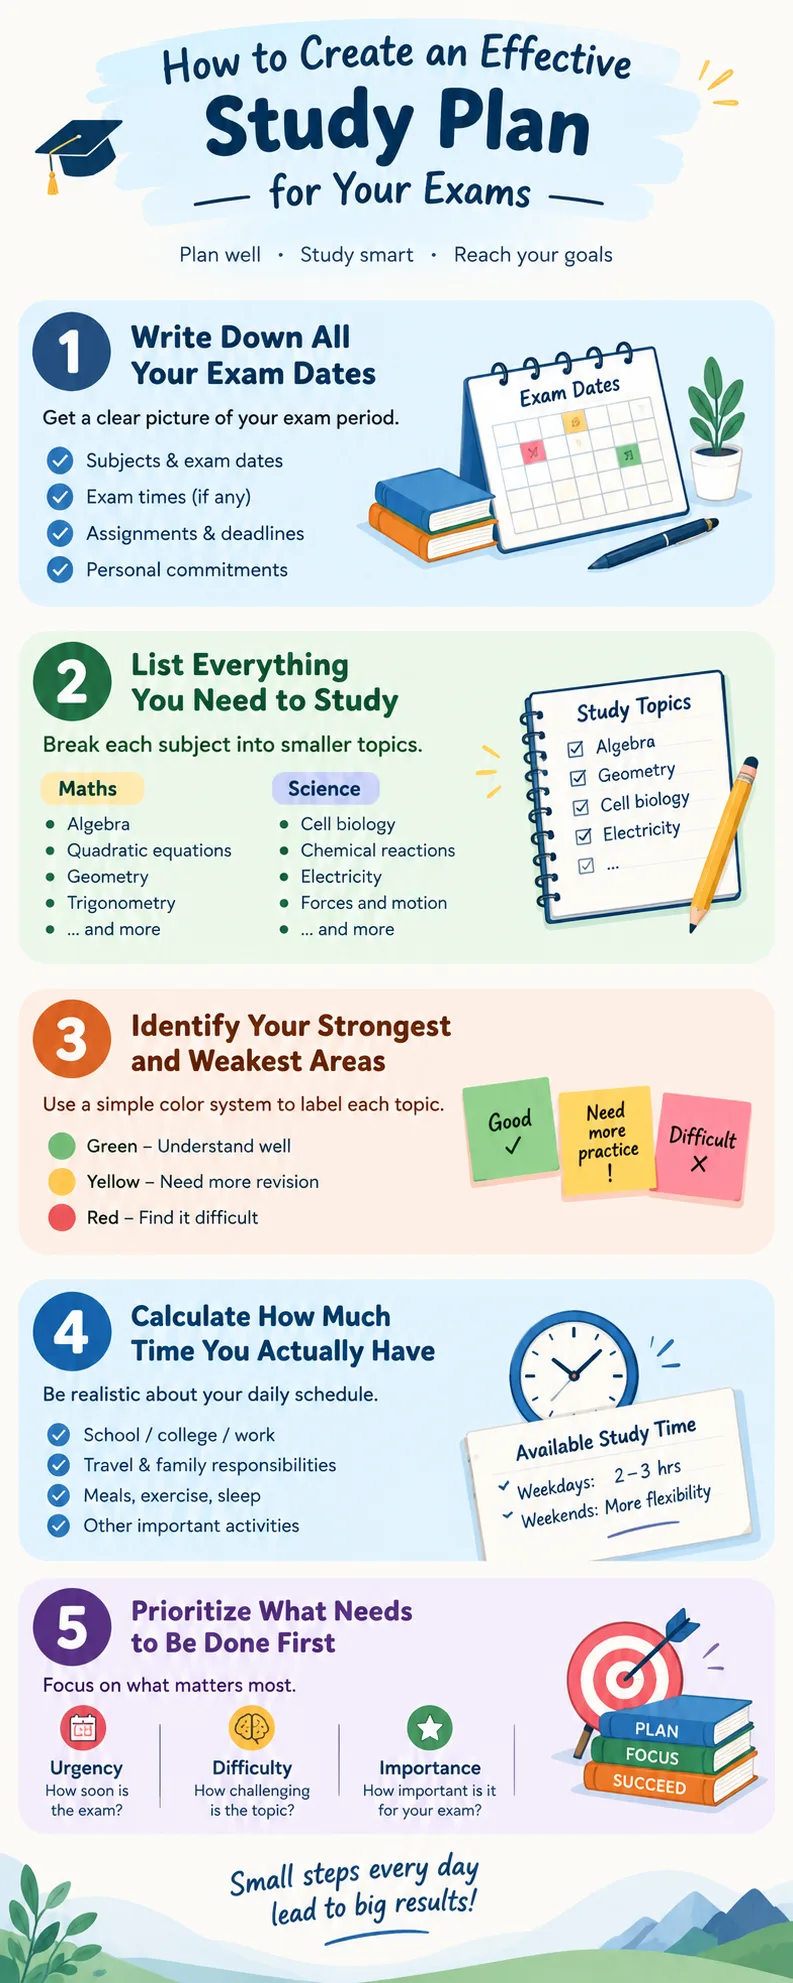
Step 1: Write Down All Your Exam Dates
Before deciding what to study each day, get a clear picture of your exam period.
Write down:
- Every subject you have an exam for
- The date of each exam
- The time of each exam, if relevant
- Any major assignments or deadlines
- Important personal commitments
You can use a notebook, calendar, spreadsheet, or digital planning tool. The format does not matter as much as seeing all your deadlines in one place.
For example:
| Subject | Exam Date | Days Remaining | Priority |
|---|---|---|---|
| Mathematics | June 10 | 14 | High |
| Science | June 13 | 17 | High |
| English | June 16 | 20 | Medium |
| History | June 18 | 22 | Medium |
This gives you an immediate overview of your situation.
An exam that is coming sooner may need more immediate attention. In such a case, timing is not only a factor, but you should also consider the difficulty level and how much material you need to cover.
Step 2: List Everything You Need to Study
Looking at an entire subject and writing “Study Mathematics” on your timetable is usually too vague. Instead, break each subject into smaller topics.
For example, your mathematics revision list might include:
- Algebra
- Quadratic equations
- Geometry
- Trigonometry
- Probability
- Statistics
- Past-paper questions
Your science list might include:
- Cell biology
- Chemical reactions
- Electricity
- Forces and motion
- Ecosystems
- Practical experiments
Breaking subjects into smaller tasks makes a large workload feel more manageable. It also helps you see exactly what you need to do.
Instead of sitting at your desk wondering where to begin, your schedule can tell you:
Tuesday, 4:00–5:00 P.M.: Review quadratic equations and complete 10 practice questions.
That is much easier to start than simply writing “Study maths” in your study table.
Step 3: Identify Your Strongest and Weakest Areas
Not every topic needs the same amount of attention. In some topics your confidence level may be high if you are already familiar on it’s course material. Topics with low confidence level may confuse you every time they appear in a test.
So, you need to go through your list and label each topic based on your current level of confidence. To label each topic you can use a simple color system:
- Green: I understand this well.
- Yellow: I understand some of it but need more revision.
- Red: I find this difficult and need significant practice.
You do not need to spend equal amounts of time on every topic. Your schedule should generally give more attention to:
- Difficult topics
- Topics you have not studied recently
- High-value topics that are important for the exam
- Subjects where you currently need the most improvement
This does not mean you should completely ignore your easy subjects. You still need to review them. But spending three hours revising something you already understand while avoiding your weakest topic is not an effective use of limited time.
Step 4: Calculate How Much Time You Actually Have
This is where many study schedules become unrealistic.
Do not begin by asking: “How many hours should I study?”. Instead, ask: “How many hours can I realistically study?”
Look at a normal day and include your existing commitments, such as:
- School or college
- Classes
- Work
- Travel
- Family responsibilities
- Meals
- Exercise
- Sleep
- Other important activities
Then identify the time you can realistically dedicate to studying. For example, you may discover that on weekdays you have 2 to 3 useful hours available, while weekends give you more flexibility.
A schedule based on your real life is much more valuable than one based on an imaginary version of your life where you have unlimited energy and no distractions.
Be honest with yourself when planning. If you know you cannot concentrate for 4 hours without a break, do not schedule 4 hours of uninterrupted study.
Step 5: Prioritize What Needs to Be Done First
Once you know your exam dates, available time, and topic list, start prioritizing. A simple way to prioritize is to consider 3 things:
- Urgency: How soon is the exam?
- Difficulty: How challenging is the topic for you?
- Importance: How important is the topic for your exam preparation?
A difficult topic for an exam next week will usually need much more attention than an easy topic for an exam several weeks away. However, avoid spending every study session on the subjects you dislike most.
Constantly studying difficult material can quickly become mentally exhausting. You need a balanced day, which might look like this:
- Start with a challenging, high-priority task.
- Take a short break.
- Move to a different subject or type of activity.
- Finish with a review task, practice exercise, or easier topic.
Step 6: Turn Large Goals Into Specific Study Tasks
One of the biggest reasons students procrastinate is that the task in front of them feels too large.
For example:
- Too vague: Revise biology.
- More specific: Review cell structure and complete 15 practice questions.
- Even more actionable: Spend 25 minutes reviewing cell structure notes, then answer 15 questions and check incorrect answers.
The more clearly you define a task, the easier it becomes to begin. Try to write each study block around an action.
Use tasks such as:
- Review
- Explain
- Practice
- Compare
- Memorize
- Summarize
- Solve
- Test yourself
For example:
- Solve 20 algebra problems.
- Create flashcards for key history dates.
- Explain photosynthesis without looking at your notes.
- Complete one section of a past paper.
- Review mistakes from yesterday’s practice questions.
Step 7: Choose Study Blocks You Can Actually Maintain
You do not have to study for several hours continuously to make progress. The right study-block length depends on your concentration and the type of task you are doing.
Some students prefer:
- 25 minutes of focused study followed by a short break
- 45 to 50 minutes followed by a longer break
- 60-minute sessions for deeper work
Experiment with each study block and find what works for you. The important thing is to avoid scheduling endless study sessions without breaks.
A simple evening schedule could look like this:
4:00–4:50 p.m. — Mathematics: Practice quadratic equations
4:50–5:05 p.m. — Break
5:05–5:55 p.m. — Science: Review chemical reactions
5:55–6:30 p.m. — Dinner and rest
6:30–7:15 p.m. — English: Analyze one practice question
7:15–7:30 p.m. — Break
7:30–8:00 p.m. — Review flashcards and plan tomorrow’s tasks
Notice that the schedule is focused without trying to fill every minute of the evening.
Step 8: Schedule Difficult Tasks When Your Energy Is Highest
Pay attention to when you work best. Some students concentrate better early in the morning. Others do their best work in the afternoon or evening.
Try to schedule your most demanding tasks during your strongest concentration periods. For example, if you are mentally tired after dinner, that may not be the best time to learn a difficult new topic. You might use that time for lighter revision, flashcards, or reviewing material you have already studied.
Save high-focus periods for tasks such as:
- Learning difficult concepts
- Solving challenging problems
- Writing practice answers
- Completing timed practice papers
You do not need to copy someone else’s ideal routine. The best study schedule is built around how you actually work.
Step 9: Include Breaks, Sleep, and Other Commitments
A study schedule that ignores basic needs is not realistic. Each need should be given certain time. Do not treat the following basic needs as wasted time:
- Sleep
- Meals
- Short breaks
- Exercise
- Time with family
- Necessary personal responsibilities
Trying to eliminate everything except studying can lead to exhaustion and make it harder to stay focused. Instead, include these activities in your plan from the beginning. This creates a more honest schedule and reduces the feeling that you are constantly “behind.”
Step 10: Leave Buffer Time for the Unexpected
One of the most useful things you can add to a study schedule is empty space. The reason is that things will not always go according to plan.
You may take longer than expected to understand a topic, miss a study session, get sick, have an unexpected commitment, need extra time for a difficult subject, and discover weaknesses during practice
If every hour of your schedule is already assigned, one missed session can disrupt the entire week. Instead, leave some flexible study blocks. For example, you might keep Saturday afternoon available for catch-up, difficult topics, or extra revision.
If you do not need the time for catch-up, you can use it for additional practice or take time to rest. So buffer time makes your schedule more resilient.
Step 11: Use Active Study Methods
Creating a good schedule is important, but the quality of your study sessions also matters. Simply spending several hours reading the same notes is not always the most useful approach.
Try to include activities that require you to actively work with the material. Depending on the subject, this could include:
- Answering practice questions
- Completing past papers
- Testing yourself without notes
- Using flashcards
- Explaining a topic aloud
- Solving problems
- Writing short summaries from memory
- Reviewing and correcting mistakes
For example, instead of writing “Study history for one hour,” your schedule could include:
Review the causes of World War I for 20 minutes, then answer two practice questions without notes and check your responses.
Step 12: Review Your Progress Every Few Days
Your first study schedule is not a contract. You should adjust it as you learn more about what is working.
Every few days, take a few minutes to ask yourself:
- What did I complete?
- What did I miss?
- Which topics took longer than expected?
- What am I still struggling with?
- Which exam is becoming more urgent?
- Does next week’s plan need to change?
After getting your answers, you need to update your schedule. For example, you may discover that you need another session for trigonometry but no longer need as much time for a topic you now understand.
Thus, adjusting your schedule is not failing. It is part of good planning.
Example of a Realistic Weekly Study Schedule
Here is an example of how a student with three major subjects might organize a week.
Monday
- Mathematics: Difficult problem practice
- Science: Review one weak topic
- 15 minutes: Flashcards
Tuesday
- English: Practice writing task
- Mathematics: Review mistakes from previous session
- Short science revision
Wednesday
- Science: Practice questions
- History: Review key events
- Plan Thursday’s tasks
Thursday
- Mathematics: Timed practice
- English: Review feedback or notes
- Flashcards
Friday
- Science: Weak topic revision
- Light review of the week’s work
Saturday
- Morning: Complete a practice paper
- Afternoon: Flexible catch-up session
- Evening: Rest
Sunday
- Review difficult areas
- Organize notes and materials
- Create the next week’s schedule
- Take time to rest before the new week
Note: Your own schedule does not need to look exactly like this. Use it as a framework, not a rule.
Common Mistakes to Avoid When Creating a Study Schedule
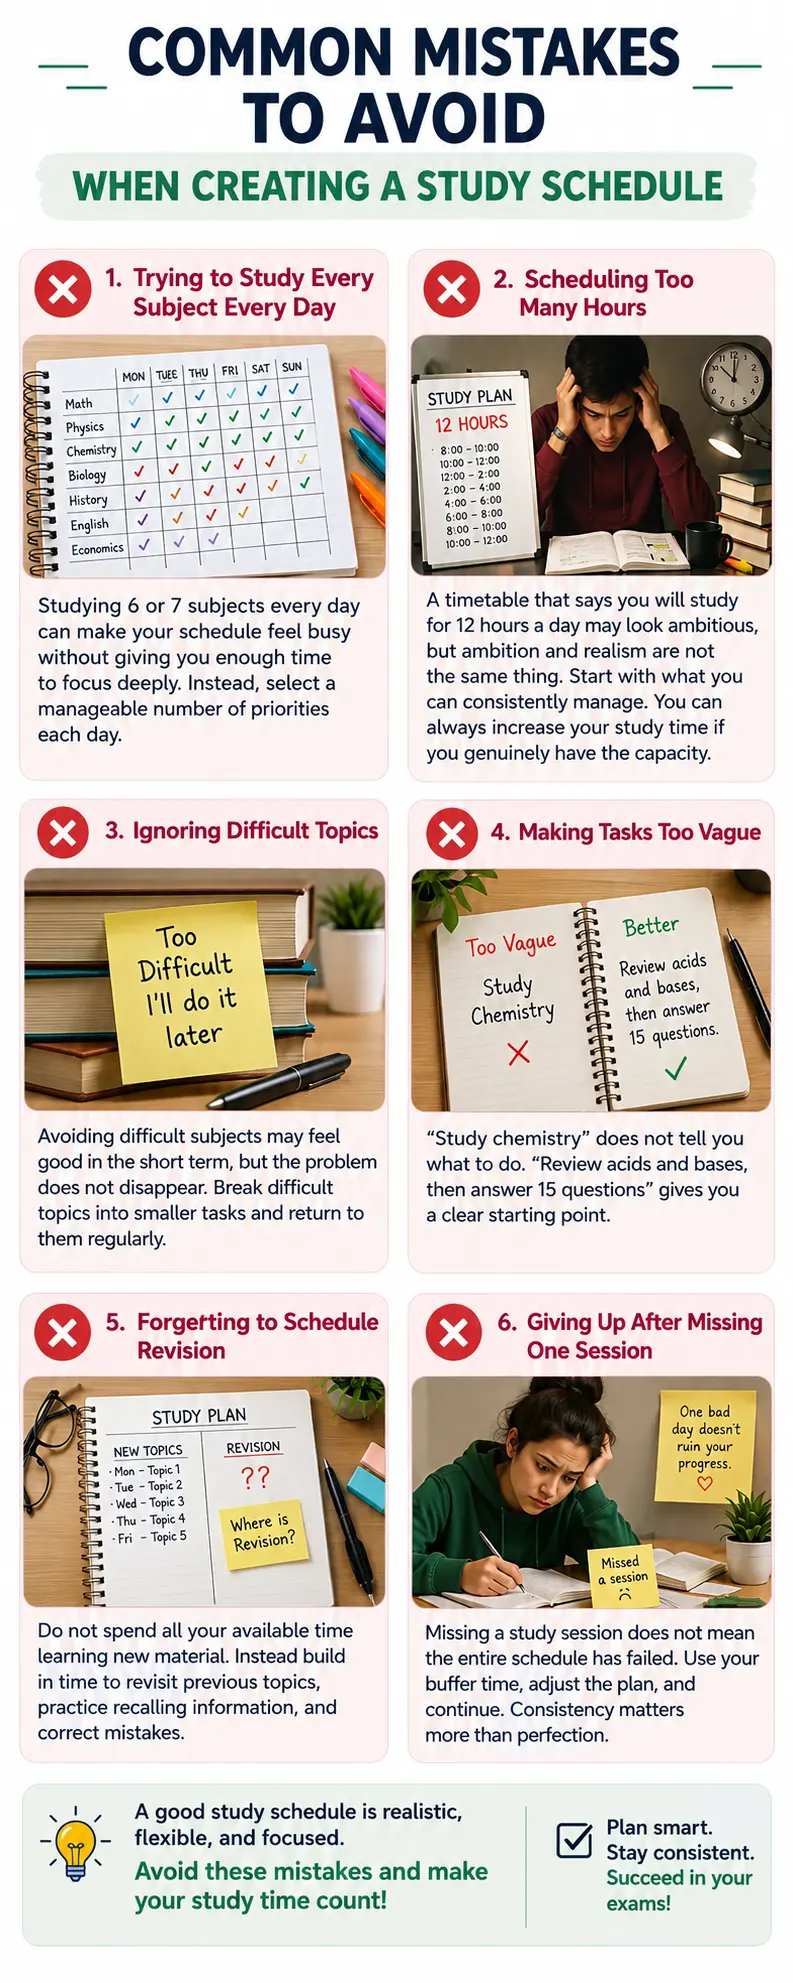
Trying to Study Every Subject Every Day
Studying 6 or 7 subjects every day can make your schedule feel busy without giving you enough time to focus deeply. Instead, select a manageable number of priorities each day.
Scheduling Too Many Hours
A timetable that says you will study for 12 hours a day may look ambitious, but ambition and realism are not the same thing. Start with what you can consistently manage. You can always increase your study time if you genuinely have the capacity.
Ignoring Difficult Topics
Avoiding difficult subjects may feel good in the short term, but the problem does not disappear. Break difficult topics into smaller tasks and return to them regularly.
Making Tasks Too Vague
“Study chemistry” does not tell you what to do. “Review acids and bases, then answer 15 questions” gives you a clear starting point.
Forgetting to Schedule Revision
Do not spend all your available time learning new material. Instead, build in time to revisit previous topics, practice recalling information, and correct mistakes.
Giving Up After Missing One Session
Missing a study session does not mean the entire schedule has failed. Use your buffer time, adjust the plan, and continue. Consistency matters more than perfection.
A Simple Study Schedule Template
If you are not sure where to start, use this basic template:
Date: __________
Exam or priority subject: __________
Task 1: __________
Time: __________
Task 2: __________
Time: __________
Task 3: __________
Time: __________
Breaks: __________
Catch-up or buffer time: __________
Today’s main goal: __________
What I need to review tomorrow: __________
Remember to always keep your study plan simple since a schedule should help you start studying, not become another complicated task to manage.
Use Our Study Planner Tool
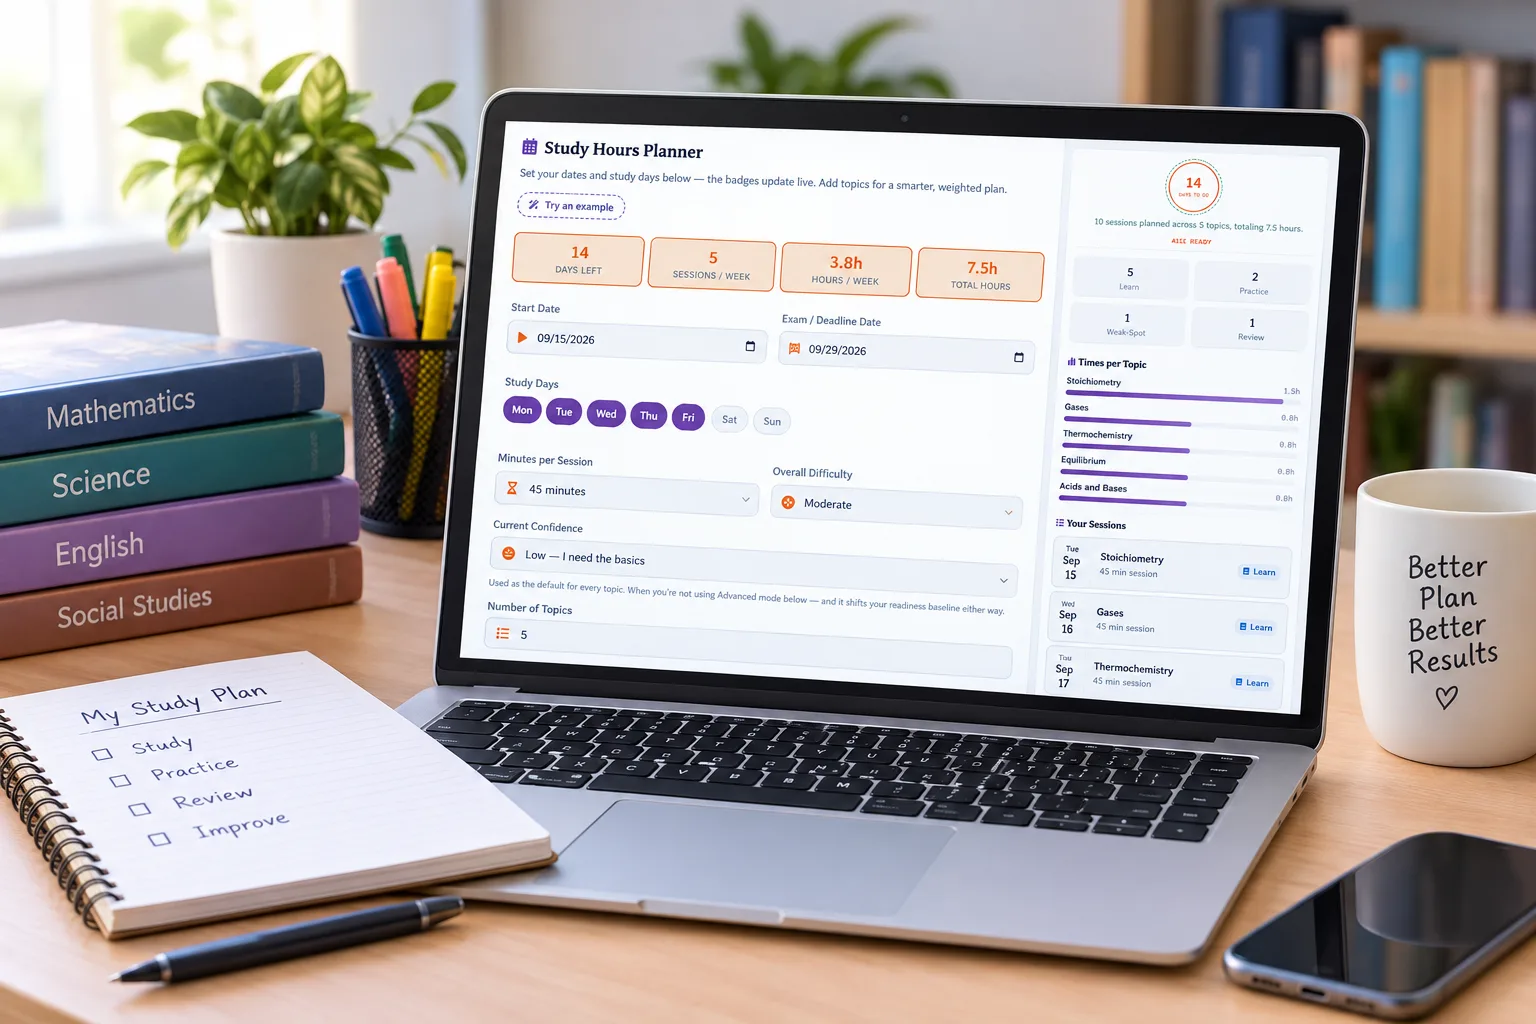
Wondering how many hours you should study each day before your exams? It’s easy to create a study timetable that looks impressive on paper but leaves you exhausted after a few days. A realistic study schedule should be based on the time you actually have, the number of subjects you need to cover, and how many days are left before your exams.
That’s where our Study Hours Calculator can help.
Instead of guessing how much time to dedicate to each subject, use the calculator to get a clearer idea of your available study hours. Enter your study details, and use the results as a starting point for creating a balanced exam study schedule that you can realistically follow.
How the Study Hours Calculator can help
- Estimate your daily study hours based on the time available before your exams.
- Plan your study time more realistically instead of trying to study for unrealistic hours.
- Balance your subjects and avoid leaving important topics until the last minute.
- Create a practical study routine that leaves room for breaks, revision, and unexpected delays.
- Start planning with confidence instead of wondering where to begin.
Remember, the goal isn’t to study every waking hour. The goal is to make the hours you have count.
Ready to build a realistic study schedule?
Try our Study Hours Calculator and find a practical starting point for your exam preparation.
Final Thoughts: Make Your Study Schedule Work for You
A realistic study schedule is not the one with the most study hours. It is the one that helps you make steady progress without becoming so overwhelming that you stop following it.
Start by identifying your exam dates and available time. Break each subject into smaller topics. Prioritize your weaknesses and urgent exams. Create specific tasks instead of vague goals, and leave room for breaks and unexpected changes.
Most importantly, review your plan regularly.
Your schedule does not need to be perfect on the first day. It needs to be useful.
Make a plan. Start with the next task. Adjust when necessary. Then keep going.
